Managing Collection Whitelists
This guide covers how to add wallet addresses to your whitelist and manage whitelist access for your NFT collections after they’ve been launched.
Overview
After launching a collection with whitelist stages, you need to add approved wallet addresses before minting begins. This process involves:
- Adding wallet addresses to your collection’s whitelist
- Validating addresses to ensure they’re correct
- Enabling the whitelist to activate whitelist minting
Prerequisites
Before managing your whitelist:
- ✅ Collection must be created and launched
- ✅ Collection must have whitelist stages configured
- ✅ You must be the collection owner
- ✅ Whitelist addresses should be collected in advance
Step-by-Step Whitelist Setup
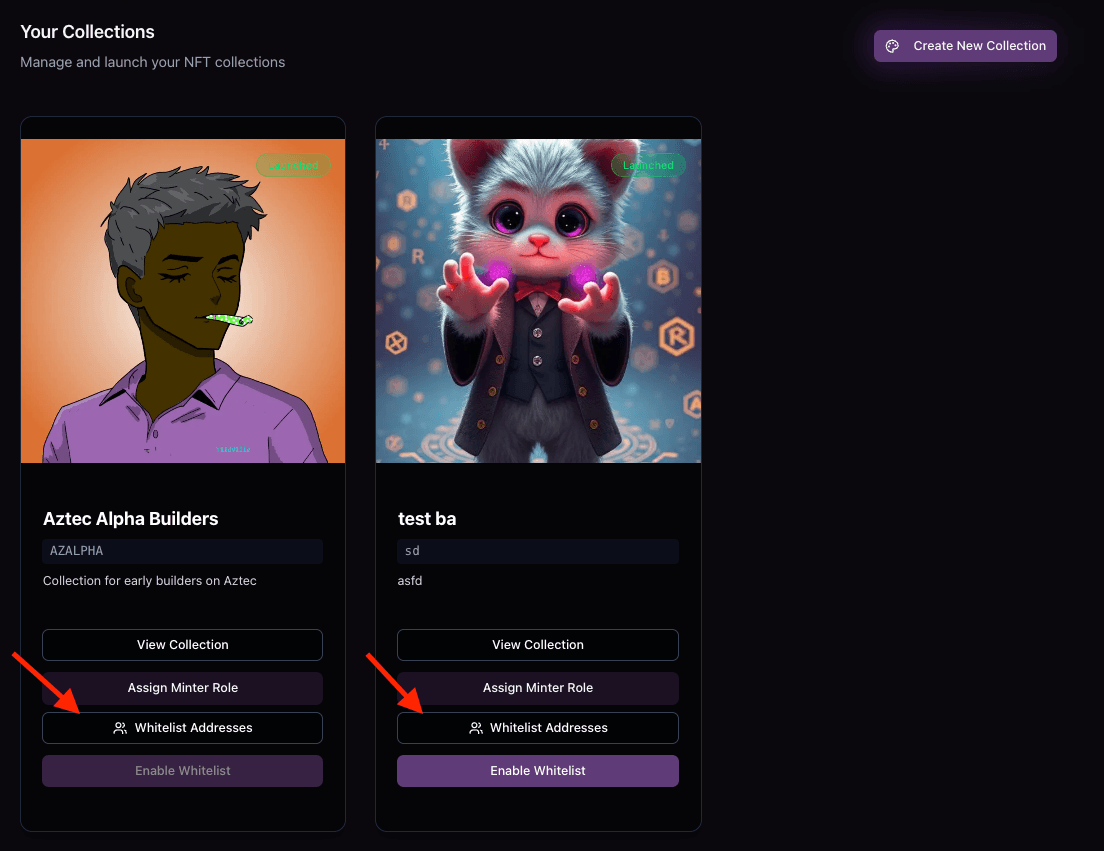
Step 1: Access Whitelist Management
- Navigate to your Profile page
- Click on the Collections tab
- Find your launched collection from the list
- Click the “Whitelist Users” button on your collection card

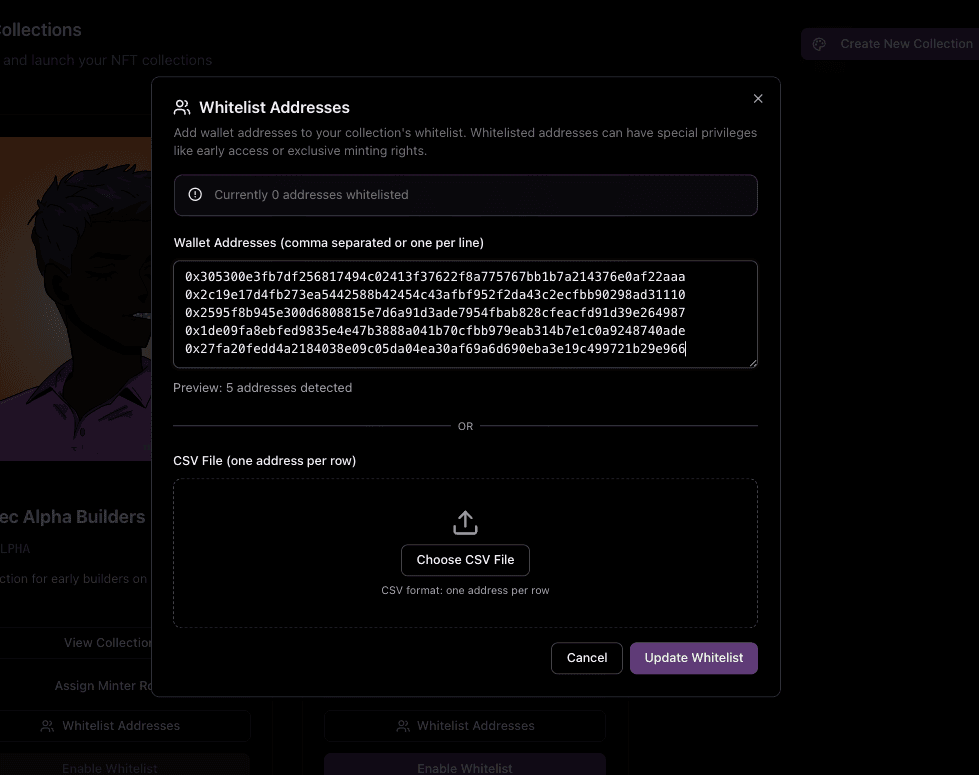
Step 2: Open Whitelist Modal
Clicking “Whitelist Users” opens the whitelist management modal with two options for adding addresses.

Step 3: Add Wallet Addresses
You have two methods to add addresses:
Method A: Manual Entry
Best for: Small lists (under 50 addresses)
- Paste addresses directly into the text field
- Separate multiple addresses using any of these methods:
- Commas:
address1, address2, address3 - Line breaks: One address per line
- Commas:
Example manual entry:
0x305300e3fb7df256817494c02413f37622f8a775767bb1b7a214376e0af22aaa
0x2c19e17d4fb273ea5442588b42454c43afbf952f2da43c2ecfbb90298ad31110
0x2595f8b945e300d6808815e7d6a91d3ade7954fbab828cfeacfd91d39e264987
Method B: CSV Upload
Best for: Large lists (50+ addresses)
- Prepare your CSV file with one address per row
- No headers needed - just addresses
- Click “Choose CSV File” and select your file
- Download our template for the correct format
CSV Format Example:
0x2595f8b945e300d6808815e7d6a91d3ade7954fbab828cfeacfd91d39e264987
0x1de09fa8ebfed9835e4e47b3888a041b70cfbb979eab314b7e1c0a9248740ade
0x27fa20fedd4a2184038e09c05da04ea30af69a6d690eba3e19c499721b29e966
0x1de09fa8ebfed9835e4e47b3888a041b70cfbb979eab314b7e110a9248740ade
Download CSV Template: Whitelist Template.csv
Step 4: Validate Addresses
After entering addresses (manual or CSV):
- Automatic validation checks each address format
- Valid addresses ✅ are accepted and counted
- Invalid addresses ❌ show error messages
- Success confirmation displays total addresses added
Common validation errors:
- Invalid address format
Step 5: Enable Whitelist
- “Enable Whitelist” button activates after successful address upload
- Click “Enable Whitelist” to make the whitelist live
- Confirmation message appears when whitelist is active
Security Considerations
Troubleshooting
Common Issues & Solutions
“Enable Whitelist” Button Stays Disabled
- ✅ Ensure at least one valid address is uploaded
- ✅ Check for validation error messages
- ✅ Try refreshing the page and re-uploading
CSV Upload Fails
- ✅ Verify CSV format matches template exactly
- ✅ Check for hidden characters or wrong encoding
- ✅ Try smaller batches if file is very large
- ✅ Remove any headers or extra columns
Addresses Not Being Accepted
- ✅ Verify addresses are valid Aztec wallet format
- ✅ Check for extra spaces, commas, or characters
- ✅ Ensure addresses start with “0x”
Users Can’t Mint During Whitelist Phase
- ✅ Confirm whitelist is enabled
- ✅ Verify user’s exact address is in whitelist
- ✅ Check whitelist phase timing is currently active
- ✅ Ensure user is connecting correct wallet
Getting Help
For technical issues:
- Join our Discord community
- Post in any channel
- Include screenshots of error messages
Quick Reference Checklist
Before Mint Day:
- Collect wallet addresses from community
- Prepare CSV file or manual entry list
- Upload addresses to whitelist
- Validate all addresses are accepted
- Enable whitelist functionality
- Test with team member addresses
- Communicate whitelist status to community
- Verify mint timing and pricing
On Mint Day:
- Confirm whitelist is active
- Monitor whitelist minting progress
- Provide support for whitelist issues
- Prepare for public phase (if enabled)
Next Steps
After setting up your whitelist:
- Learn about Discord Integration for automated role verification
- Understand NFT minting process from the user perspective
- Explore privacy features for your collection
Need help with your first whitelist? Join our Discord community for assistance!